
Block & Inline Elements
HTML elements are the building blocks of web pages, and each one starts life with a default display value of either block or inline.
Which value an element has is determined by the type of element that it is. Elements fall into two categories: block-level elements and inline elements.
Browsers display block-level elements on their own line, pushing anything else that follows down to a new line underneath. Block-level elements also stretch to fill the full width of their container from left to right. You can visualize a page full of them as a stack of boxes.
Inline elements only occupy the amount of space that their content requires. They do not start on new lines like block-level elements and do not push elements that follow onto new lines below.
BLOCK-LEVEL ELEMENTS
The HTML Element Reference contains a guide to all of the elements currently used in HTML. There is no need to memorize these elements, and you will likely use just a handful regularly.
Common elements like <h1> to <h4> headings, and <p> paragraphs are used constantly, and we have seen these in use throughout the previous sections.
<h1>This is a <h1> heading.</h1><h2>This is a <h2> heading.</h2><h3>This is a <h3> heading.</h3><h4>This is a <h4> heading.</h4><h5>This is a <h5> heading.</h5><h6>This is a <h6> heading.</h6><p>This is a paragraph.</p>This is a <h1> heading.
This is a <h2> heading.
This is a <h3> heading.
This is a <h4> heading.
This is a <h5> heading.
This is a <h6> heading.
This is a paragraph.
These elements fall into the category of block-level elements. Let's look at how we can examine that.
Examining with DevTools
If we right-click one of these elements and select inspect from the menu, Google Chrome DevTools will open.
DevTools allows us to see what is going on behind the scenes of any web page.
For example, in the Elements tab, we can see the full HTML structure of any page. When you hover the cursor over an element, it will highlight its location inside the browser window.
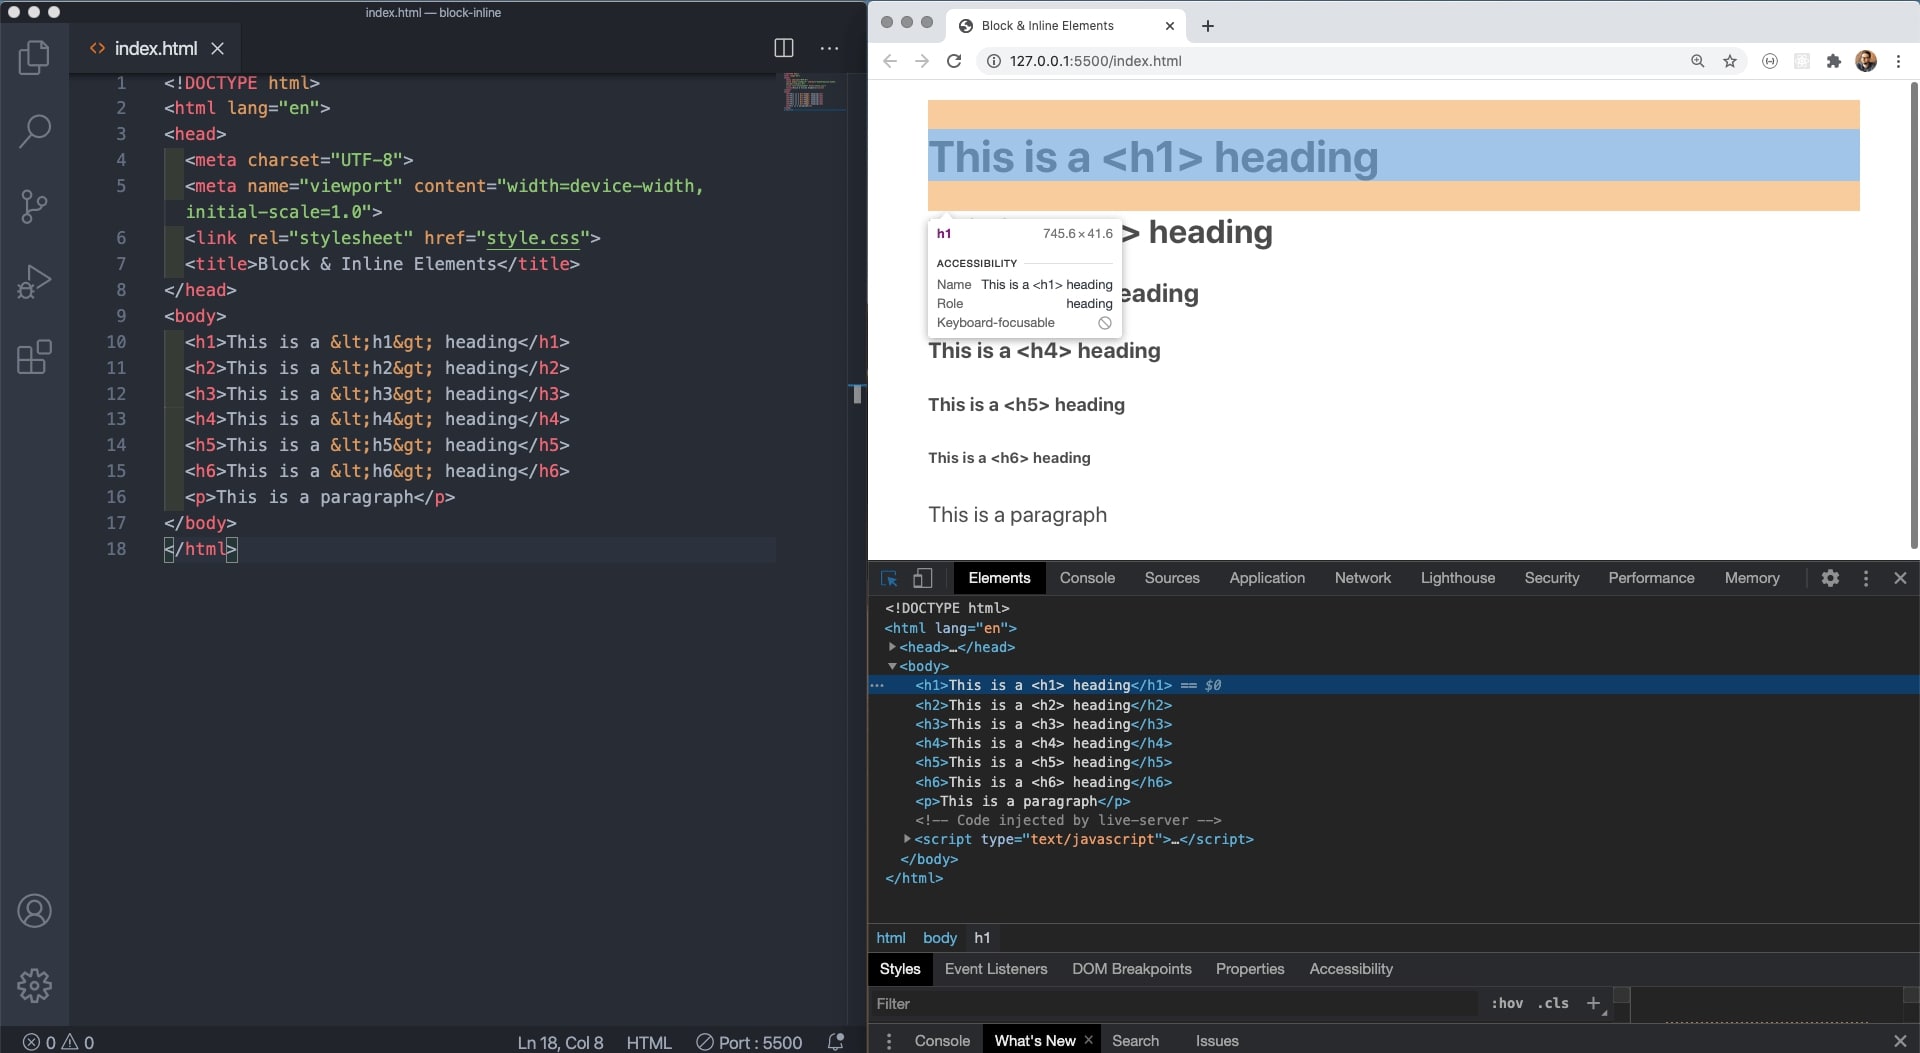
We can also use the arrow icon in the top left corner of the DevTools panel to hover elements on the web page. Doing this will show us exactly where a hovered element is nested within the HTML structure.
Note that each element is stretching the full width of the viewport and takes up the whole line that it sits on, effectively, pushing everything else that follows underneath.
These are the core behaviors of block-level elements.
INLINE ELEMENTS
The opposite of block-level elements are inline elements.
Inline elements sit inline, only taking up the space that their content requires. So they will sit next to other inline elements on the same line or sit within the content flow of block-level elements.
Examples of inline elements include images and links. Below is an example of a link sitting inline with the text of a paragraph:
I am a paragraph with a link sitting inline with the paragraph text.
Links
The <a> (anchor) element creates a hyperlink to:
- External locations out on the web.
- Internal locations within a single web page.
- Other web pages within the same website.
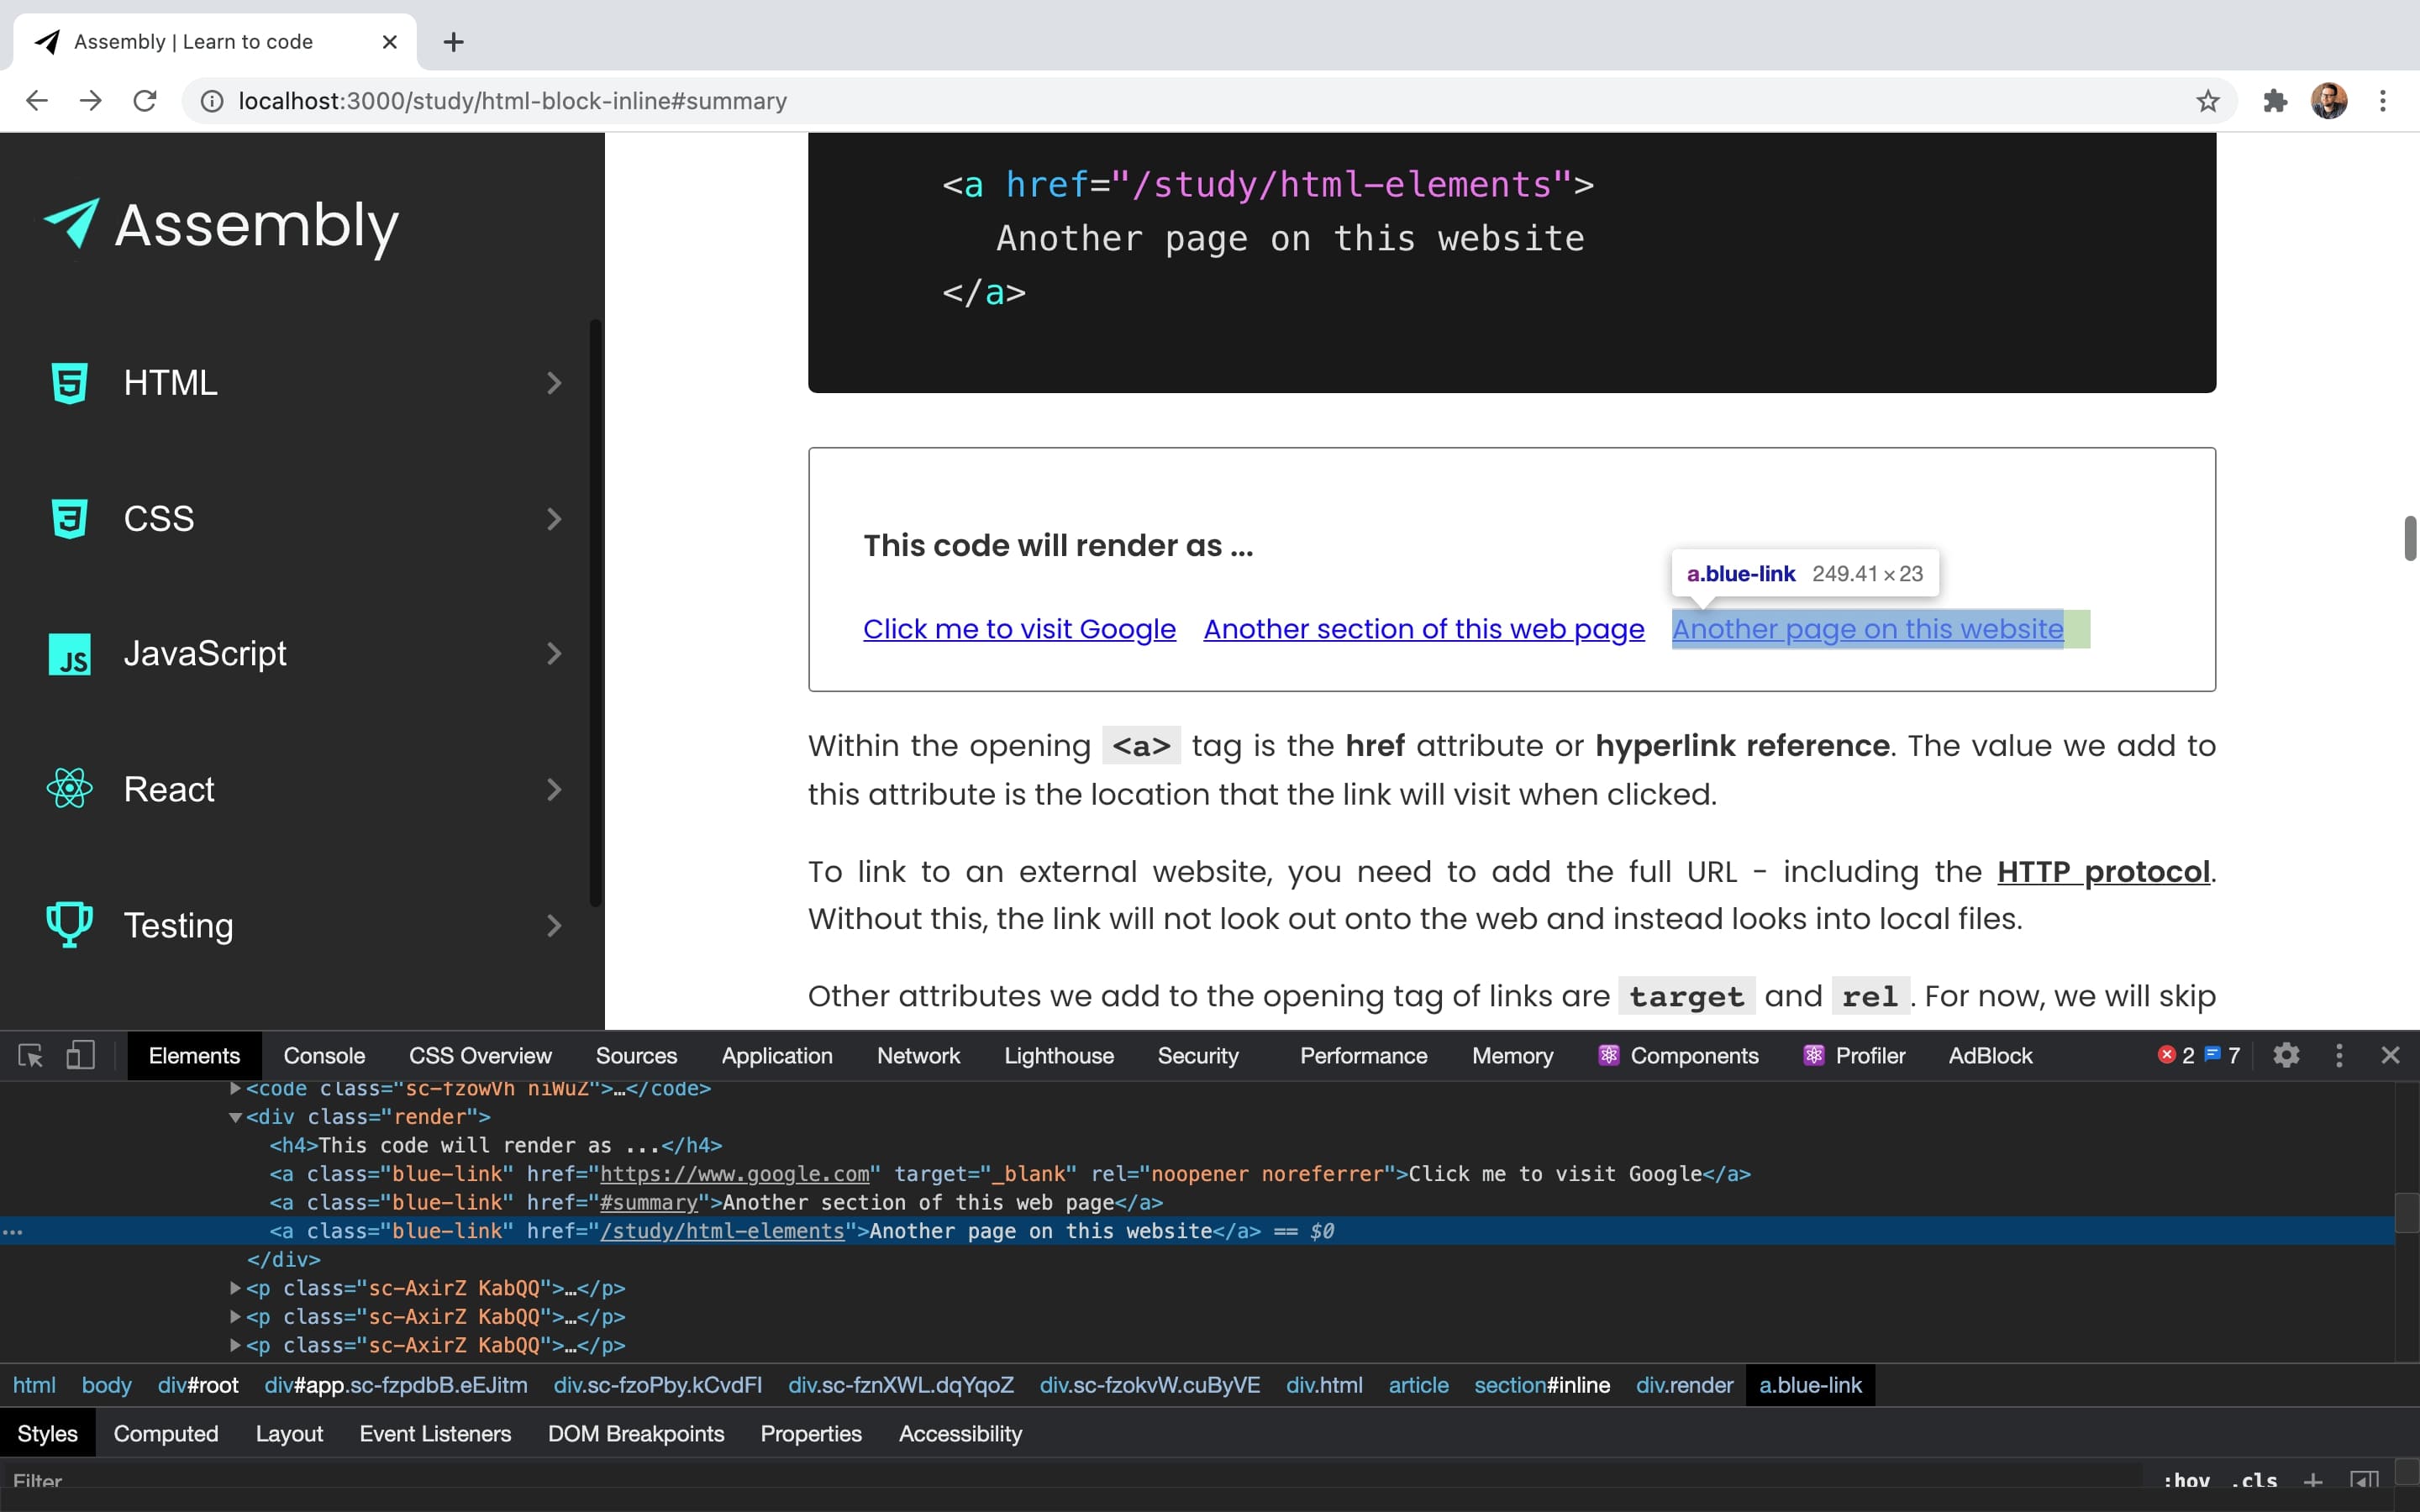
<a href="https://www.google.com">Click me to visit Google</a><a href="#summary">Another section of this web page</a><a href="/study/html-elements">Another page on this website</a>Click me to visit GoogleAnother section of this web pageAnother page on this websiteWithin the opening <a> tag is the href attribute or hyperlink reference. The value we add to this attribute is the location that the link will open when clicked.
To link to an external web page, you need to add the full URL - including the HTTP protocol. Without this, the link will not look out onto the web and instead looks into local files.
Other attributes we add to the opening tag of links are target and rel. For now, we will skip past these attributes as we will discuss them in a later section.
Note that each link is sitting on the same line as the link that precedes it, and is also only as large as its text content requires.
We can see this if we again use DevTools to inspect a link.
Images
The <img> element embeds an image into the document. We can also add images to our web pages with CSS and JavaScript. I will show you how later on in those respective sections.
<img src="https://images.unsplash.com/photo" alt="alt text goes here"/>
The <img> element comes with an src attribute, which represents the source location of the image. Again, this could be a location within our project's files or a URL for an external web page.
Images also need an alt or alternative text attribute for when an image cannot be viewed.
This could happen if there is an error in the src of the image, if there is a weak internet connection, or if the user is visually impaired and using a screen reader.
VIEWING INLINE ELEMENTS IN THE BROWSER
In the CodePen below, I have added one <img> element, randomly sourced from unsplashed.com, and three <a> elements linking to Google, Microsoft, and Apple.
Images must have an src attribute, and the links must have an href.
The link also needs text or other content so that there is something clickable in the browser.
Note that these elements display differently to block-level elements. The image and the links sit next to each other on one line.
Inspecting these elements with DevTools confirms that they are only as big as their content needs to be.
In a previous section we saw elements like <strong>,<sup>, <sub>, and <em> that format text.
As these elements wrap text content and do not force the text they wrap on to a new line, they must be inline elements.
INLINE ELEMENTS FOR FORMATTING TEXT
In the CodePen I have added four paragraphs with some inline text formatting.
- The first <p> element has some bold text given by the <strong> element wrapping the first sentence.
- The second <p> element has some italic text given by the <em> element wrapping the first sentence.
The <strong> tag is semantic HTML which we will discuss in a later section.
Previously, we could have added a <b> tag for bold text, but <b> does not tell us anything about the meaning of the content.
<strong> gives us a little more meaning and tells us that the text will appear strongly on the page. It is the same for <em> for italic which gives our text emphasis.
- The third <p> element has some superscript text given by the <sup> element.
- The fourth <p> element has some subscript text given by the <sub> element.
Superscript text is slightly smaller text and elevated from the baseline.
Subscript text is set below the baseline.
We see again that, these elements have not pushed anything down to the next line, given that they are inline elements. That being said, we’ll never format our text this way these days.
Though these elements do exist and are perfectly valid HTML, we will never use them to format text. We use CSS to do that job.
It is much better to separate our concerns. We use HTML for structuring content, and any styling or formatting is done by CSS.
There is a whole host of CSS properties available that makes our text bold, or italic, or upside down, and so on. We will cover these in the CSS section.
However, these HTML text formatting elements are good to know, and nicely illustrate the differences in how block and inline elements work.
SUMMARY
We have seen the difference between block-level and inline elements.
Browsers display block-level elements on a new line, and you can visualize them as a stack of boxes. They stretch the full width of the page and push elements that follow below.
Conversely, inline elements do not start on a new line, and they only occupy the amount of space their content requires.
So I hope you found this distinction useful. Understanding how block and inline elements differ is essential to understanding space and layout when we are building web pages.
In the next section, we will look at HTML lists. We use lists to present information in a well-formed and semantic way, and a common example is to use a list for the navigation links at the top of a web page.