
Tables
An HTML <table> is a set of structured data, that is organised and presented in a tabular format. Usually, table data is arranged in a series of rows and columns and would be familiar to most of us.
A table allows us to find information easily. For example, common types of data that we might display in a table could include the times that trains or flights are scheduled to arrive and depart, or a table of financial data related to the performance of a given stock price.
You can create a table using the <table> element. Inside the <table> element, you use <tr> or table row elements to create rows. To create columns inside rows you use <td> or table data elements. You can also define a cell as a header for a group of table cells using the <th> element.
TABLES AS A TOOL FOR LAYOUT
In the early days of the web, before Flexbox & CSS Grid, developers used tables to layout their web pages. It was the lazy person’s way to make sure that page elements were neatly arranged on the screen.
This design pattern is now considered to be bad practice. Though occasionally, you may still find pages, or parts of pages, that are laid out inside tables.
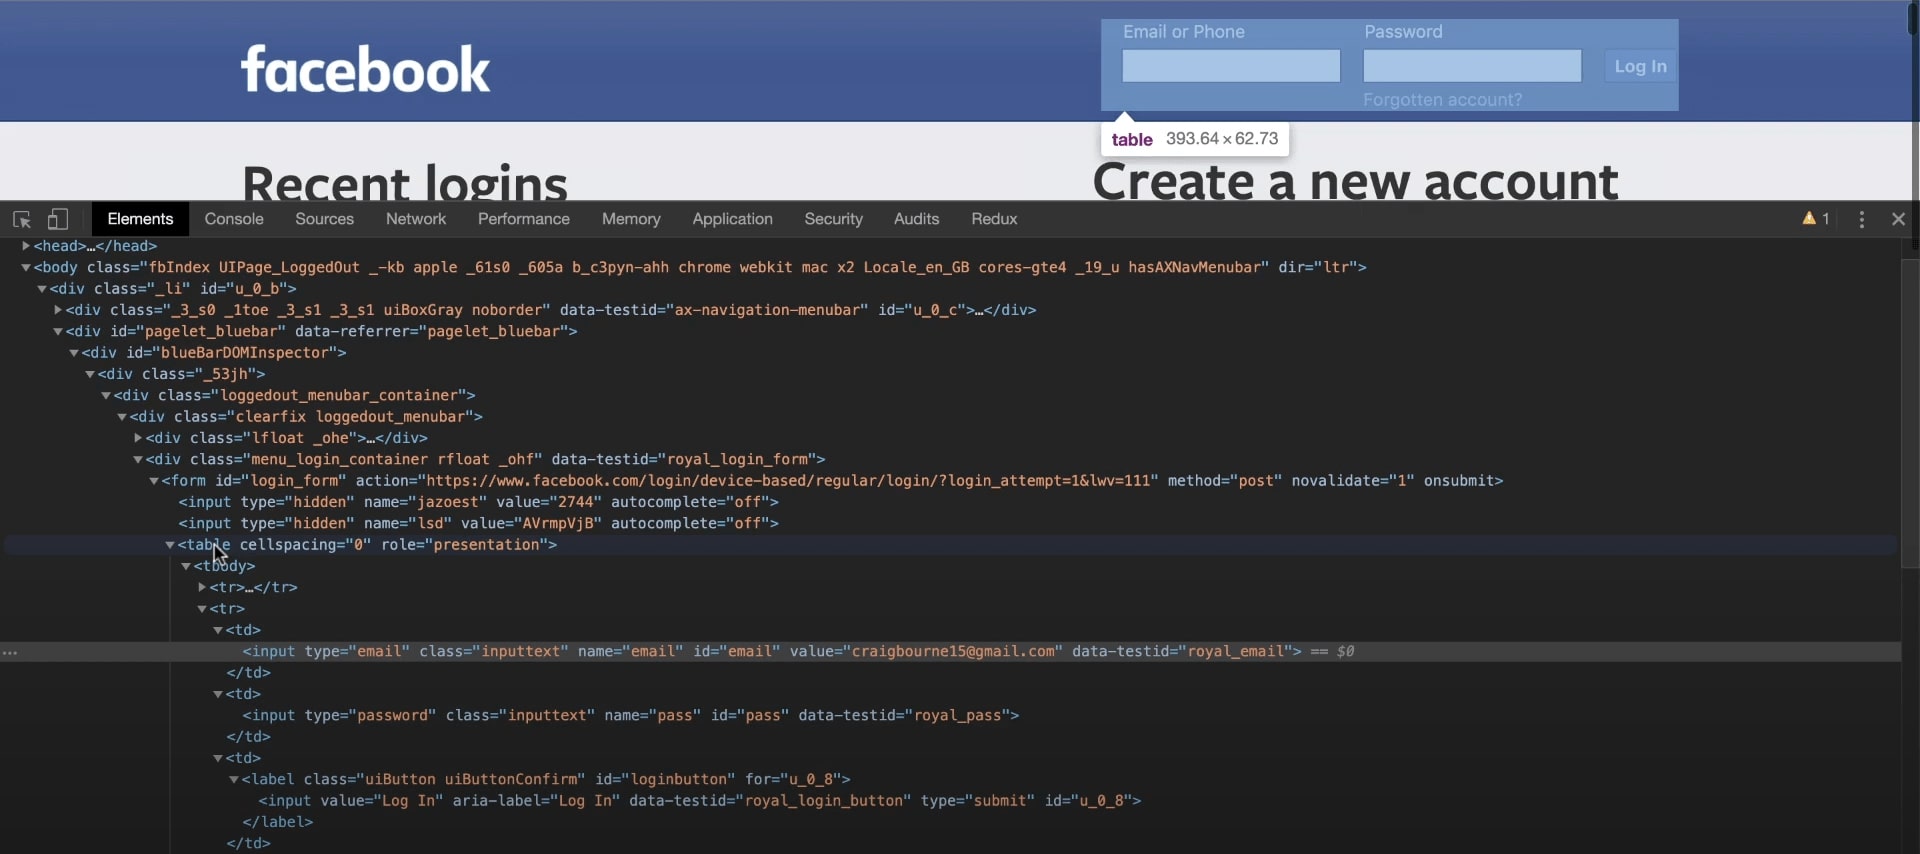
In fact, until early 2020, Facebook was laying out their main login form with a table by enclosing the email & password fields within <td> of table data tags.
Instead, our layout and presentation will be done using CSS, and we only have a few more HTML section left to go before we can finally start tackling CSS. However, that doesn't mean you should avoid completely tables — tables do have a purpose and should be used whenever you need to present information in a tabular format.
TABLES OUT IN THE WILD
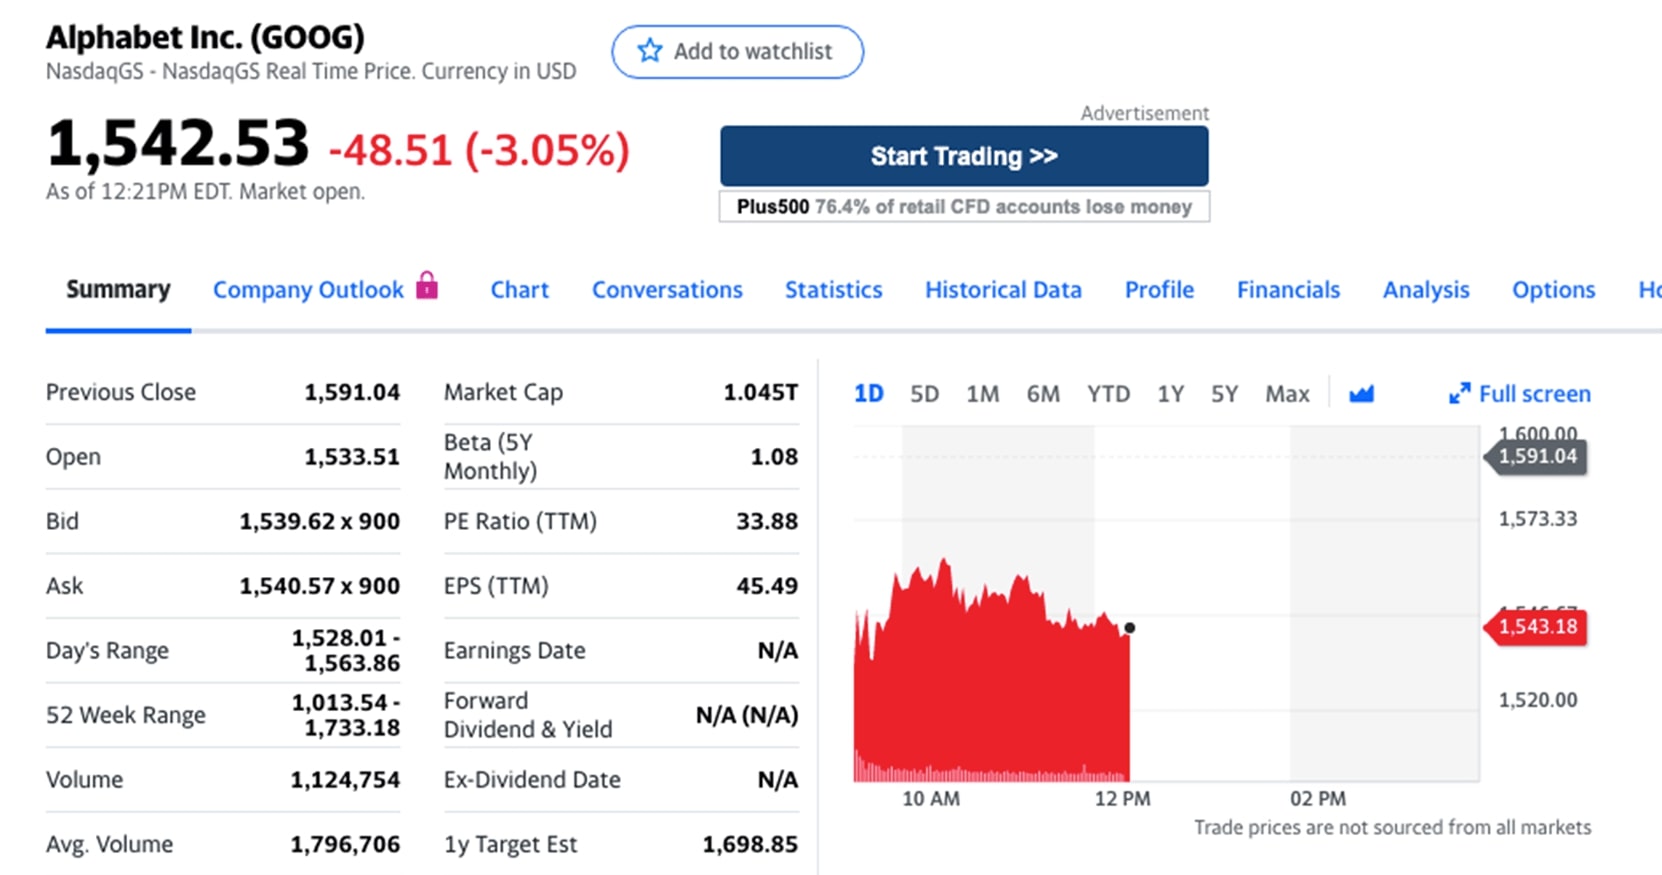
One common example that you might see often, are tables for financial data. Here I have a Yahoo Finance table which is displaying financial data related to Google's parent company Alphabet's stock price.
If we go to the Nasa Space Science Data Centre, we have a much simpler HTML table that contains a decent amount of data on the planets of the Solar System.
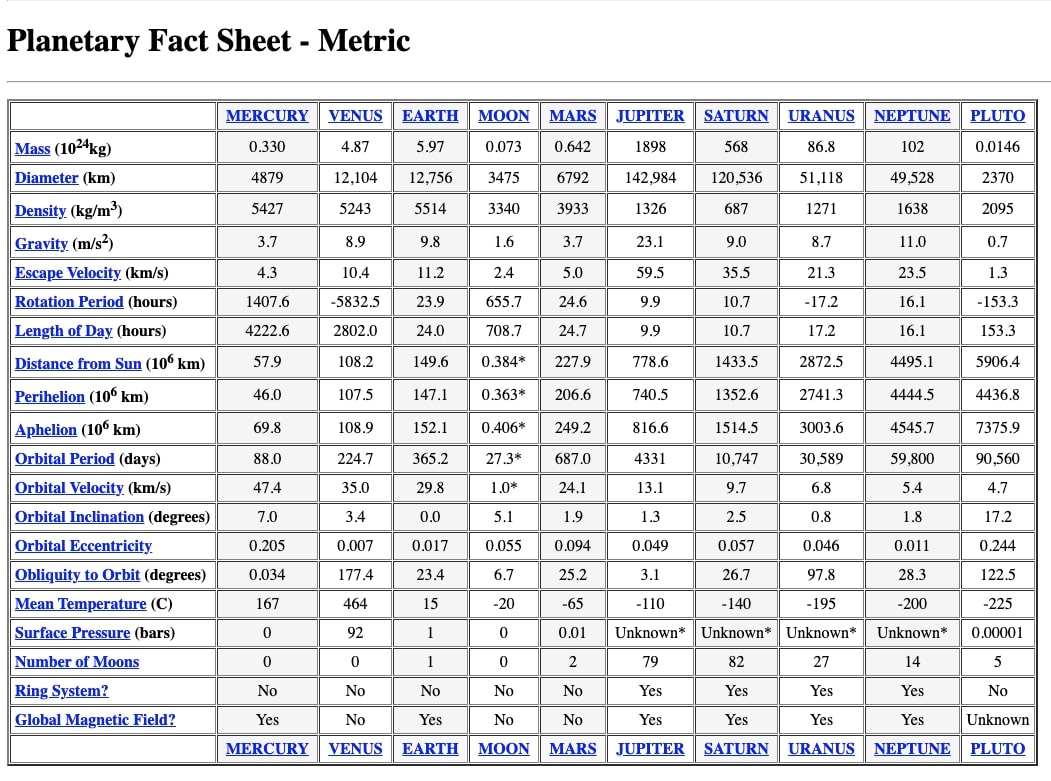
Straight away, we can easily interpret the information by making visual associations. We should be able to find a planet that has a day which lasts 24 hours, or a planet that has a ring system and 62 moons. We can find all of this quickly by scanning the table's columns and rows.
ELEMENTS OF A TABLE
An HTML table is defined with the <table> tag.
<table></table> tags on their own don't give us anything, if we save and refresh, we see that. We need content. We need data for our table. But, we still have a bit of work to do with the structure of the table.
We give tables rows and these rows will have individual table data cells.
A table row is defined with the <tr> tag. A table header is defined with the <th>tag. By default, table headings are bold and centred. A table data/cell is defined with the<td> tag.
Similar to the actual structure of our HTML file, our table has a head and a body. These are denoted by the <thead> and <tbody> elements respectively which are nested within the <table> element.
Next, we need to add some rows to both the table head and table body and we do this with<tr> tags.
<table><thead><tr> </tr></thead><tbody><tr> </tr></tbody></table>Now we have our basic structure we can start to add the content and data of our table. The table head has headings and the table body has data. We make these with the <th> and the <td> respectively
So inside the <tr> which is in the <thead> section, we'll add 3 <th> elements, and in each we'll add some text.
So that’s the first content of our table. We'll follow the same process for the table body, except that instead of <th> for table heading, we use <td> for table data.
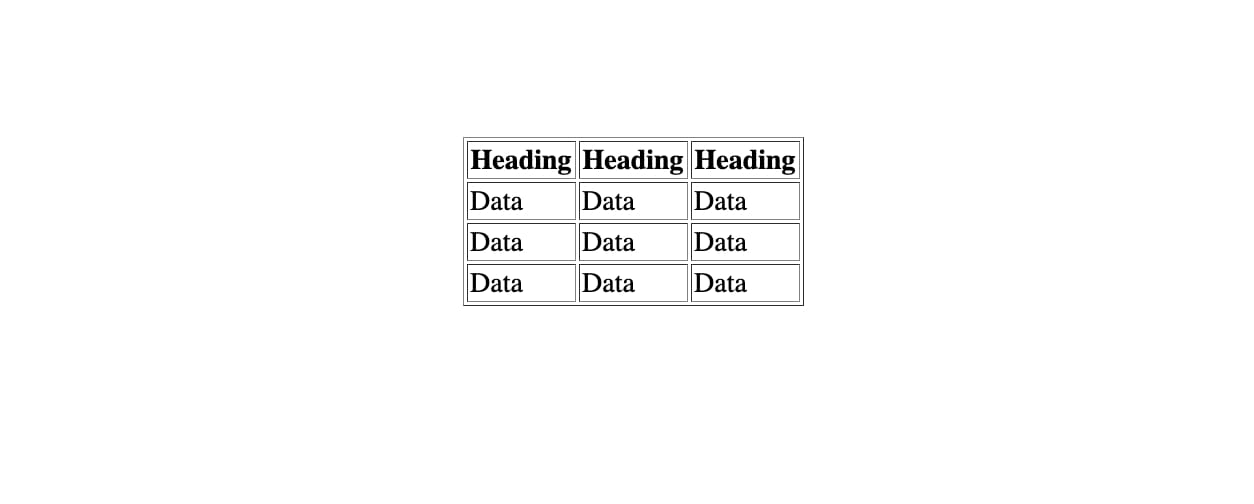
To give us some more data, I'll copy the row inside the <tbody> and paste it twice more. Your table now should look something like this:

And your code should look something like this:
<table><thead><tr><th>Heading</th><th>Heading</th><th>Heading</th></tr></thead><tbody><tr><td>Data</td><td>Data</td><td>Data</td></tr><tr><td>Data</td><td>Data</td><td>Data</td></tr><tr><td>Data</td><td>Data</td><td>Data</td></tr></tbody></table>| Heading | Heading | Heading |
|---|---|---|
| Data | Data | Data |
| Data | Data | Data |
| Data | Data | Data |
TABLE BORDERS
We have a nice table now with some content, but everything is floating on the page seemingly unattached.
So the very final step is to add an attribute to the opening <table> tag which will give the table a border.
Tables do not have borders by default. When we learn CSS in the next section we'll learn to add borders to tables with the border property. Also, table cells are sized just large enough to fit the contents by default. To add more space around the content in the table cells you can use the CSS padding property.
But for now, as we are not using CSS, we will use an attribute called border and give it a value of 1px:
<table border="1px">We should note though, that most of the <table> element's attributes such as border,cellpadding, cellspacing, width, and align were deprecated in HTML5, so do avoid using them. We should use CSS to style HTML tables.
But for this tutorial, we'll use the border attribute because we're still working with only HTML. Modern browsers will still support deprecated attributes.
So if we save and refresh, we see that the attribute adds the border and the table is beginning to look a lot more like we would expect a table to appear.
Note that our table heading <th> has had default bold styling applied to it to indicate that it is a heading. And the columns are all aligned as you see.
It’s not the prettiest table I have ever seen, but in the CSS section of the course, we’ll have a special section on how we style tables and get them looking a little easier on the eye than they do for us currently with plain, unstyled HTML.
EXERCISE: BUILD A TABLE
So, let’s take on a quick little exercise. We’re going to build out something that looks like an invoice or an order for some fruit, and we’re going to do it using tables. I’ve shown you much of what we’re going to use. Namely, the <table> element and it’s border attribute, <thead> and <tbody>, <ht> and <tr>elements and the <td> element.
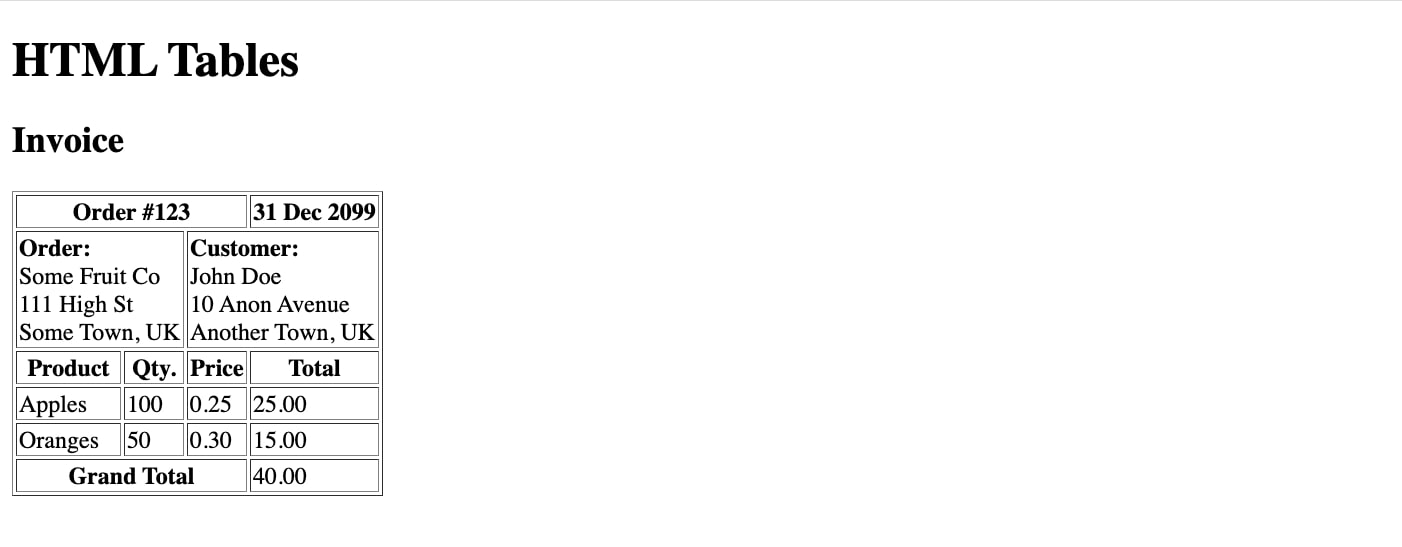
It will look a little something like this when finished:
We’re also going to see a couple of new things. Namely, a table footer or <tfoot> element which is used to group footer content in an HTML table.
We’ll also include the colspan or column span attribute which is new to us too. This attribute allows us to make a table cell span more than the default of one column.
We’ll also look at the line break <br/> tag, which we haven’t used yet, and this inserts a single line break.
With this information and the image above, if you think you’ll be able to attempt to build this table then give it a go.
BUILDING THE TABLE'S OUTER STRUCTURE
So keep the image of the table in view, perhaps open it in a new tab, We can break this down into distinct sections.
The very top row will be our <thead>, the very bottom row will be our <tfoot> and everything in between will be our <tbody>.
As always, we start by defining that this is going to be a table using the <table> element.
This element is going to have a border attribute so that the cells of our table can be seen by the reader much more clearly. Again, CSS will give us better options to do this, but for now, we're working with HTML only, so the border attribute will help us out. We’ll give our border attribute the value of 1px.
<table border="1px"> </table>The <tfoot> or table footer element is one element that we haven’t examined yet. It is placed after the table body <tbody> element.
If you were displaying numerical data inside a table, you could use the <tfoot> to summarise totals, as we will do here. It would contain <tr> elements and <td> elements just like the <tbody>.
We see our <thead> has two rows, the <tbody> has three rows and the <tfoot> has a single row.

So let’s add those nested inside our table element.I have a thead element with two nested rows, a tbody with three nested rows, and a tfoot with one row.
<table border="1px"><thead><tr> </tr><tr> </tr></thead><tbody><tr> </tr><tr> </tr><tr> </tr></tbody><tfoot><tr> </tr></tfoot></table>BUILDING THE TABLE'S INNER STRUCTURE
Now we have a basic outer structure for our table, we’ll go through each part of it and build it out - starting with the <thead>.
The Table Header
So the <thead> has two rows and in the first row, we’ll need two <th> elements. The first has the text 'Order #123' and the second has the text '31 Dec 2099'.
The second row has two <td> elements for some table data.
The first <td> has a strong element applied to the first line of text, and then every line we appears to start on a new line. We can do this using a <br> or line break element. Copy the text from the table image or add some of your own.
<thead><tr><th> Order #123 </th><th> 31 Dec 2099 </th></tr><tr><td><strong>Order:</strong> <br/>
Some Fruit <br/>
111 High St <br/>
Some Town, UK</td><td><strong>Customer:</strong> <br/>
John Doe <br/>
10 Anon Avenue <br/>
Another Town, UK</td></tr></thead>
The Table Body
<tbody> has three <rows>, the first of which has 4 <th> elements. The text in those is Product, Qty, Price & Total.
Then the next two rows both have four <td> elements each. The first has the text 'Apples, 100, 0.25, 25.00'.
The next row has the text 'Oranges, 50, 0.30, 15.00'.
<tbody><tr><th>Product</th><th>Qty.</th><th>Price</th><th>Total</th></tr><tr><td>Apples</td><td>100</td><td>0.25</td><td>25.00</td></tr><tr><td>Oranges</td><td>50</td><td>0.30</td><td>15.00</td></tr></tbody>The Table Footer
Just the <tfoot> now, and this has a <th> element with the text of Grand Total, and a <td> element with total which is 40.00.
<tfoot><tr><th>Grand Total</th><td>40.00</td></tr></tfoot>Now we have all of the info in just fine, but our table doesn’t look as it supposed to yet.
SPANNING COLUMNS
We fix this quite simply with one attribute. This is the colspan attribute.
The value we give it is the number of cells that we want our column to span
So looking at the design we’re trying to replicate:
- the first <th> element in our <thead> is spanning 3 columns. So we will need to add colspan="3" to the opening <th> tag.
- the <td> elements underneath are both spanning two columns each. They aren’t quite as wide as the first <th> element but are wider than the cells in the body. So each of these will need colspan="2" to both of the opening<td> tags inside the second row of the <thead>
- The last thing is the <tfoot>. The <th> where it says 'total' is as wide as the first <th> in the<thead> section. We already know that we need to put colspan=”3” to the <th> nested inside the only row in the <tfoot>.
Our code should look like so:
<table border="1px"><thead><tr><th colspan="3"> Order #123 </th><th> 31 Dec 2099 </th></tr><tr><td colspan="2"><strong>Order:</strong> <br/>
Some Fruit <br/>
111 High St <br/>
Some Town, UK</td><td colspan="2"><strong>Customer:</strong> <br/>
John Doe <br/>
10 Anon Avenue <br/>
Another Town, UK</td></tr></thead><tbody><tr><th>Product</th><th>Qty.</th><th>Price</th><th>Total</th></tr><tr><td>Apples</td><td>100</td><td>0.25</td><td>25.00</td></tr><tr><td>Oranges</td><td>50</td><td>0.30</td><td>15.00</td></tr></tbody><tfoot><tr><th colspan="3">Grand Total</th><td>40.00</td></tr></tfoot></table>
Once we have that, if we save and check between the two files, we see that we have matched the design exactly (except for the non-default font applied to this website).
| Order #123 | 31 Dec 2099 | ||
|---|---|---|---|
| Order: Some Fruit 111 High St Some Town, UK | Customer: John Doe 10 Anon Avenue Another Town, UK | ||
| Product | Qty. | Price | Total |
| Apples | 100 | 0.25 | 25.00 |
| Oranges | 50 | 0.30 | 15.00 |
| Grand Total | 40.00 | ||
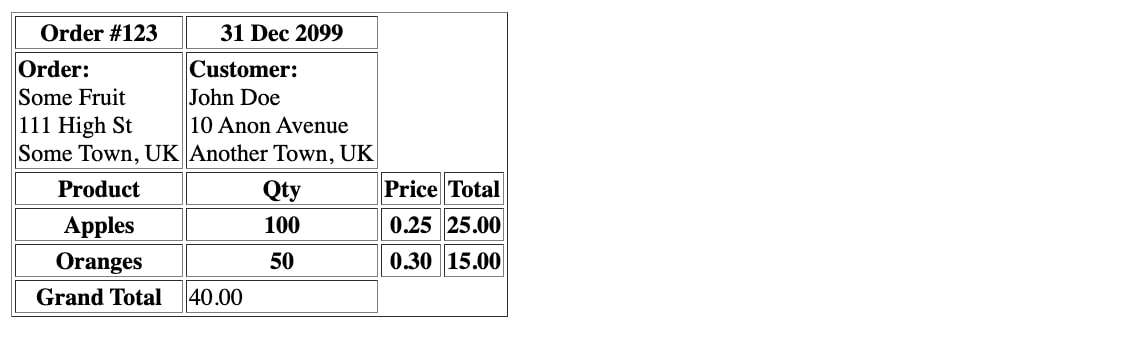
The original design:
SPANNING ROWS
Similarly to spanning columns, we could use the rowspan attribute to create a cell that spans more than one row. In the example above we have not needed to do that.
So below, here's a quick example of a table showing a Starbucks order. We see that Jennifer has ordered more than one product, and the rowspan attribute allows us to show one heading of 'Order:' for the three rows containing products.
The value we give to the rowspan attribute is the number of rows we want the cell to span.
The <caption> element
You will also notice at the top of the table we have added caption (or title) by using the HTML <caption< element.
The <caption> element must be placed directly after the opening <table> tag.
By default, the caption will appear at the top of the table, but you can change where it is positioned with the CSS caption-side property.