
Links, Images, and Attributes
Attributes provide additional information about HTML elements. They can configure elements or adjust their behavior in a variety of ways. For example, images, videos, and several other HTML elements can have height and width attributes that determine size.
We saw some attributes in the last section on Lists in HTML. We learned that the start attribute determines the value from which the list starts counting. There was also a reversed attribute which reverses the order the list counts from.
So there are many uses for HTML attributes. They come in a variety of forms, serve many purposes, and change the behavior of elements.
So in this section, we will learn:
- All HTML elements can have attributes.
- Attributes provide additional information about elements.
- We add attributes to the opening tag.
- Attributes usually come in key/value pairs like attribute="value".
HTML ATTRIBUTE SYNTAX
We add attributes to the opening tag of elements, and they usually come in key/value pairs:
<tag key=”value”></tag>So we have a key or name and some quotation marks into which we give the attribute a value.
So breaking this down, an attribute has two parts:
- The name or key that defines what attribute it is.
- A value placed between quotation marks.
BOOLEAN ATTRIBUTES
We can also define attributes with a single keyword.
Such attributes are called Boolean attributes. An example of a Boolean attribute would be the reversed attribute we saw used with lists. Some others include the checked, disabled, and required keywords we commonly use with form inputs.
<input type="email" required> <input type="submit" value="Submit" disabled><input type="checkbox" checked>GENERAL PURPOSE ATTRIBUTES
Some attributes, including id, class, and style, can be used with most HTML elements.
- The id attribute is a unique name or identifier for an element.
- The class attribute also identifies elements for use with CSS & JavaScript. But unlike id, the class attribute does not have to be unique in the document. You can apply a class to multiple elements.
- The style attribute allows you to specify CSS styles directly within HTML elements. Again, we will look at this in more detail in the CSS section.
<p id='main' class='text' title='paragraph' style='font-weight:bold;'>Opening paragraph</p>Opening paragraph
If you are unsure which attributes you can use with an element, a great resource to check is our HTML Attribute Reference.
The Attribute Reference lists all attributes currently used in HTML. You do not have to know all of these, and you will likely use 10 to 15 regularly.
LINKS & THEIR ATTRIBUTES
Links hold the world wide web together, and without them, there is no connectivity. Links are found in all web pages and are what enable us to be able to traverse the world wide web. They allow us to move from one page to another.
Links have two ends, which we call anchors. The link starts at the source anchor and points to the destination anchor, which can be any web resource. This resource could be an HTML document, an image, a video, or any HTML element within the document itself.
By default, browsers will display links as follows:
- An unvisited link is blue and underlined.
- A visited link is purple and underlined.
- An active link is red and underlined.
You can overwrite this default styling using CSS.
To add links, we use a set of <a> </a> or anchor tags.
The most important attribute that we add to the opening <a> tag is the href - which is short for the hyperlink reference. The href specifies the URL of the page that will open when the link is clicked.
If we wanted to link to Google, for example, we would add the URL of https://www.google.com as our hyperlink reference. We must remember to include the HTTPS or HTTP at the beginning of the URL.
HTTP stands for Hypertext Transfer Protocol. HTTP is the system that defines how data is communicated and transmitted on the web. The added 'S' to make HTTPS means that a website is secure.
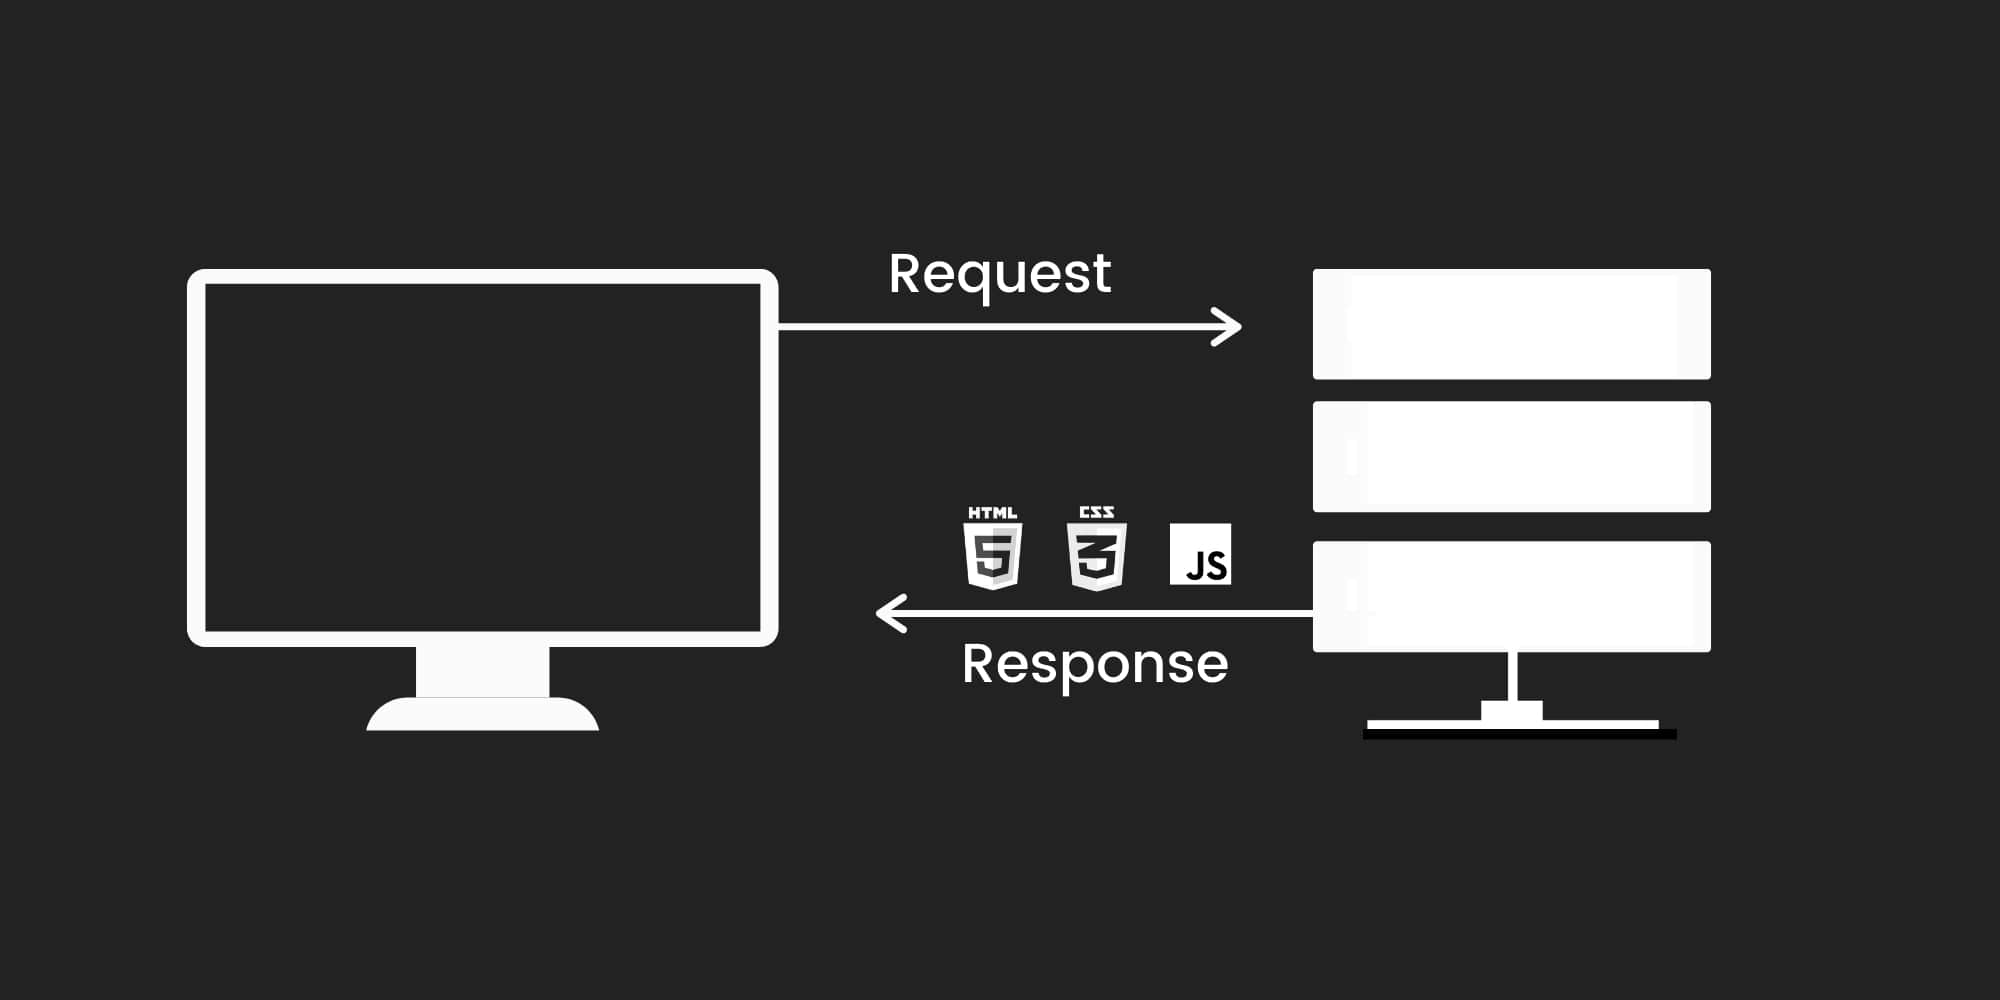
When you enter a URL in your browser, this sends an HTTP request to a web server instructing it to retrieve the requested web page, including any HTML, CSS, & JavaScript associated with it, and send it to you.
Excluding the HTTP protocol from the URL means the browser will think you are using something called the file protocol and look for whatever you are trying to link to within local files.
In addition to href and HTTP, links need clickable content. Content between the opening <a> and closing </a> tags is the part of the link users will interact with.
A link to Google may have some clickable text like so:
<a href="https://www.google.com">Link to Google</a>Link to GoogleDEAD LINKS
When building a site, you may not initially know locations you will be linking to, so you can add a temporary dead link. So dead links are placeholders of sorts. You add a hash or octothorpe symbol ( # ) as the href value, which keeps links active on the page. But clicking them goes nowhere and just has the effect of refreshing the page.
<a href="#">Click me!</a>THE TARGET ATTRIBUTE
Another attribute we can add to links the target attribute. The default value is target="_self", which means that the link will open in the current tab when clicked.
We can also use target="_blank", which allows us to open the link in a new tab. This allows us to keep the current browser tab open when the user clicks a link.
In the next section, we will cover the target attribute in much more detail.
IMAGES & THEIR ATTRIBUTES
There is no requirement for the clickable content of links to be text. We could use images instead, for example.
The HTML <img> element is a single self-closing tag. It does not need both an opening and closing tag as it does not surround text or other content. We call images of this type empty elements.
Images must have at least two attributes:
- The src attribute.
- The alt attribute.
src
The src attribute denotes the source location of the image. To reiterate, this could be within project files or from an external web page.
Image from an external source<img src="https://images.unsplash.com/photo-1606278483460-25d13da45337">
Finding images to use
A great site to get freely useable images to use in your projects is unsplash.com. Another is pexels.com. If you are looking for illustrations rather than images, undraw.co is a fantastic free resource.
Local Images
It is preferable to have images stored in a location controlled by you. If you do not have control of the image, then you do not control its location. If the URL path to the image changes, the browser will not be able to find it, and it will disappear from your site.
So, I always recommend using images that you can control.
When adding images, you need to take note of the file type. We need to know the full file name for it to work in HTML.
You can have file types including .png, .jpg, .gif, .avif, or .webp.
Image from a local source<img src="img/cat.png">Shortly, we will discuss the HTML <picture> element, which allows us to be more flexible in specifying images. We can give the browser a choice of image types or sizes to suit the user's device.
RESIZING AN IMAGE USING ATTRIBUTES
We have attributes called height and width, which allow us to size our images. We can add a numerical value without a specified unit, like 200 (which will give 200 pixels). Or we can explicitly set units, like px or %.
We just need to remember to leave a space between the attributes already present. It does not matter which order attributes are listed inside the opening tag, just that they are there. Any new attributes must be space-separated from others.
Image from an external source using width & height attributes<img src="https://images.unsplash.com/photo-1606278483460-25d13da45337" width="460" height="290">NOTE: If you resize this window, the image will always be 460 pixels wide and 290 pixels high.
ALT ATTRIBUTE & ACCESSIBILITY
You may notice that if we autocomplete an <img> element using Emmet, it also gives us an alt attribute.
Image from an external source with an alt attribute<img src="https://images.unsplash.com/photo-1606278483460-25d13da45337" alt="A random image sourced from unsplash.com">The alt attribute allows us to display alternative text when images cannot be viewed. This could occur due to a slow internet connection or if there is an error in the image source location. The alt attribute also provides a description for images that can be read by search engines. So it is helpful for SEO.
But the alt attribute's most important function is with web accessibility. The alt attribute is used by screen reader software so that a person who is listening to a web page's content (for instance, a person who is impaired visually) can still interact with the image element.
There is a great article here on the WebAIM site which explains this, and I encourage you to read it.
USING THE HTML5 PICTURE ELEMENT
Sometimes, scaling an image up or down to fit different devices fails to work as expected. Also, reducing the image dimension using width and height attributes does not reduce the size of the rendered file. If an image is to display small on a mobile phone, we might not want a large file size.
To address these problems, HTML5 introduced the <picture> element that allows us to define multiple versions of an image to target different devices.
The <picture> element contains one or more <source> elements, each referring to different image sources, and one <img> element at the end.
Each <source> element has a media attribute, which specifies a condition (similar to the media query) that the browser uses when determining which source to use.
<picture><source media="(min-width: 1000px)" srcset="logo-large.png"><source media="(max-width: 500px)" srcset="logo-small.png"><img src="logo.png" alt="My logo"/></picture>The browser will evaluate each child <source> element and choose the best match among them for the device in question.
If no suitable match is found, whatever is in the <img> element's src attribute will be used.
The last child of the <picture> element must be the <img> tag.
MAKING IMAGES BECOME LINKS
So far, we have been using text as the clickable part of links. But we can just as easily use images as well.
Doing so is simple. All we need to do is place an <img> element between the anchor tags, where text would ordinarily be.
<a href="https://www.unsplash.com"><img src="https://images.unsplash.com/photo-1606278483460-25d13da45337" alt="Image sourced from unsplash.com"></a>The image is a link. Clicking it will open unsplash.com
If you create a link like this, with an image in between the <a> element's opening and closing tags, you will be able to click the image to link to the location in the href.
DIFFERENT TYPES OF LINKS
So that is how we link to pages on other websites, and these are absolute links or the absolute path.
Additionally, we can link to pages within the same web site. These work slightly differently, and these are called relative links or the relative path.
Relative links do not need an HTTP protocol like absolute links.
Absolute link to an external website<a href="https://www.google.com">Link to Google</a>Relative link to an internal page<a href="/contact.html">Visit the contact form</a>The above example of a relative link will link to another location within the same website. A page or path relative to your current location.
Again, we do not need to add an http://, just the path to the web page. Without the HTTP protocol, the browser will search for the file in the root folder or directory for the given page.
We can also use links within a single page known as anchor links.
If you have a relatively long page that scrolls, then you might have a link that takes you back to the top of the page. Perhaps even a series of links that will relocate to a given section of the page, like below:
These are simple to create in HTML, and we do this using what is known as an ID attribute. We will discuss the full range of uses of IDs and explore what they are in detail in a later section. For now, I want to focus on their use for internal linking.
In CSS, IDs are referenced with a # symbol.
We can reference IDs this way in HTML as well, for internal linking. We can give any element an id attribute.
Something like id="contact".
We can then add an href="#contact" to an anchor tag. Then we can link to the part of the page where the element containing the matching ID is found. As shown in the video above.
<ul><li> <a href="#home">Home</a> </li><li> <a href="#about">About</a> </li><li> <a href="#contact">Contact</a> </li></ul>
These would link to elements on the same page marked up like so:
<div id="home"> ... </div><div id="about"> ... </div><div id="contact"> ... </div>
To sum up, we have three types of links:
- Absolute links take us to a specific site or page, external to the current location.
- Relative links take us to another page within the same website. The locations are relative to one another and exist within the same folder or directory.
- Anchor links take you to another part of the current page that you are on.
SUMMARY
So in this section, we have looked at HTML attributes, specifically those associated with links and images.
We have seen how we can add links using <a> tags and images with the <img> tag. We then looked at attributes and how we add these to HTML elements.
For links, the attributes were the href or hyperlink reference, and for images, it was the or source location.
These attributes provide additional information like the location of an image or the URL we want to link to. We then added additional attributes to give more information to the browser about our elements. We also added a couple of IDs that enabled us to traverse between locations on the same page.
We also looked at various kinds of links that we use to link to external pages out on the web, pages within the same site, and locations within a single page.
We will use attributes all the time. You might want to keep looking over the HTML Attribute Reference for more information. Again, you do not need to memorize all of these attributes, and you will only regularly use 10-15 of them.
FURTHER RESOURCES
- MDN: HTML Attribute Reference
- W3Schools: HTML Attributes
- MDN: The <a> Anchor element element
- MDN: The <img> Image Embed element
- W3Schools: The HTML <picture> Element
- WebAIM: Alt Text
- WebAIM: WAVE Web Accessibility Evaluation Tool
- W3C: Web Accessibility
- Unsplash
- Pexels
- Undraw