
Video & iFrame
In the past, embedding video into web pages was not an easy endeavour, as web browsers did not have a universal standard for defining media files like video.
Video and iframe elements give us two different ways in which we can go about including video on our web pages.
The HTML video element is what we would use to include videos which we would have saved locally within a project’s files, and the iframe element allows us to embed another web page or even just part of another web page into our own web pages. Sites like YouTube give us a selection of options to use the iframe element to embed videos from YouTube into our own pages. So if you have a YouTube channel of your own, or even if you just want to add a video into a project from YouTube then the iframe is how you would do this.
VIDEO
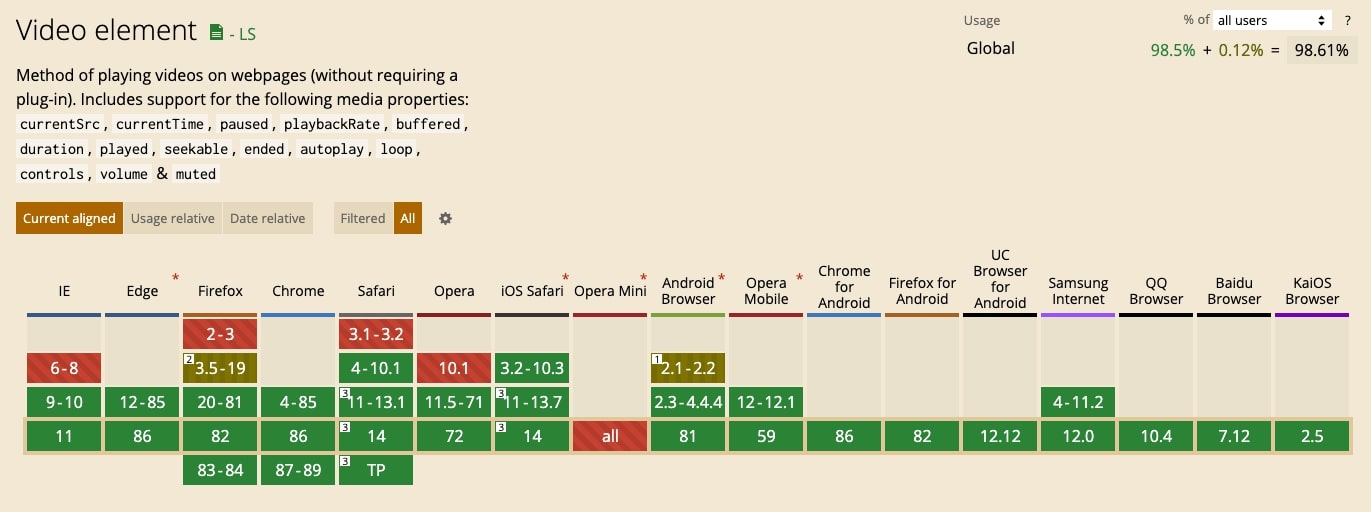
The new HTML5 semantic <video> element is what we use to embed a media player which supports video playback into an HTML document. Though this element was only introduced with the HTML5 standard, it benefits from universal support across all browsers.
Like we saw with previously the <img> element, we include an src or source attribute, within which we specify a path to the video we want to display.
The <video> element is an inline HTML element and each video only takes up the space that it requires, as opposed to block-level elements like paragraphs and headings, that start on a new line and push any content that follows to a line below.
<video src="/video/intro.mp4"></video>This video is the intro to the tutorials we post to YouTube and it is stored locally within the project's file structure for this website. The src attribute is where we specify the path to the video, relative to the HTML document. In this case the video is found within a folder called 'video' and the video file itself is called 'intro.mp4'.
The video as rendered on this page benefits from some CSS which responsiveley sizes the video to the screen it is being viewed upon. Without the CSS we would have a couple of problems. Videos with large resolutions like this will be appear in heir true resolution and would be really large and oversized on most devices. So we might want to be able to control the size the video displays in. There’s also no way for us to play the video or skip between different sections.
As we are not quite at the CSS section of videos, we can at this stage use HTML attributes to specify the video’s width and height. We can also use attributes to control whether we want it the video to autoplay and loop, and whether we want to display the video's controls.
ATTRIBUTES
So we’ll start with video size and we can use the width and height attributes. To preserve the aspect ratio of the video, it is sometimes preferrable to just use the width attribute. We can do this as the height of the video will automatically adjust in height to fit whatever width we use.
We can use any sizing unit like pixels or percentages, but if we just add a numerical value without a unit specified, we’ll get pixels by default.
So adding width=”500” that will give the video with a width of 500px. You can add the px unit to the end too. We can also use percentages, and say width=”50%” and then whatever the size of the device screen, the width of the video will always be 50% of it. Of course we would usually like to control all of these sizes with CSS, but for now, I’m just showing you that you can also do it using HTML attributes.
<video src="/video/intro.mp4" width="50%"></video>Controls
We can also add controls to videos. In the opening tag, we simply add the keyword of controls which is the same as adding controls="controls". We don’t need to add a value, just the controls keyword.
This keyword gives us the ability to play our videos, as well as things like controlling the volume, going fullscreen, using this progress bar to jump to different parts of the video, and so on. We can also make use of the keyboard as well. Like the spacebar will pause and play the video, and the left and right arrows will jump forwards or backwards in 20 second increments.
The code for the video with the controls added is:
<video src="/video/intro.mp4" width="100%" controls></video>In addition to the controls attribute we can also have a controlslist attribute which tells the browser specifically which controls to use or not use on the video.
For example, if you look on the video above, and click the three ellipsis dots on the right, we have the option to download the video. If we don’t want users to download our the video, we could add to our video elementcontrolslist=”nodownload”, and that option to download is removed.
If you go to any video on YouTube.com, and inspect you’ll see that they include this attribute on their videos. The other values we can add in to the controlslist attribute, in addition to nodownload, are nofullscreenand noremoteplayback.
Autoplay & Loop
We can also have the video play automatically when the page loads in the browser, and we can also have it play continuously on a loop.
We do this with autoplay which means the video will play automatically when the page loads and then we use the keyword of loop to have the video play again when it reaches the end so. We don’t need to specify key-value pairs for these just keywords. So in the opening tag i’ll add ‘autoplay’ and ‘loop’ and when i save we see the first one of these kicks in and the video starts playing. If we skip right to the end of the video now, we see it loops back to the start and plays again.
Adding thumbnails
We might also want to add a thumbnail to our video so we solve the problem of having just the first frame of the video showing when the page loads. Similar to what you would see on a YouTube video. Most videos on youTube have custom thumbnails uploaded by creators and we can do exactly the same on our own pages.
If we go to the MDN page for the video element, and scroll down to the attributes section, we see controls and controlslist and if we go to the end of the attributes, we see width, src and just above this attribute called poster which allows us to specify a path to an image which will be displayed instead of the first frame of the video.
<video src="/video/intro.mp4" width="100%" controls poster="og.jpg"></video>Now you see below that the video we have been using has a placeholder or thumbnail image in place.
IFRAME
Next we’ll take a look at including videos in our web pages from sites like YouTube and Vimeo.
If you have your own YouTube channel, you might be interested in posting the videos from your channel on your own page. YouTube & Vimeo make it really simple to do.
Underneath any YouTube video we have this option to ‘Share’.
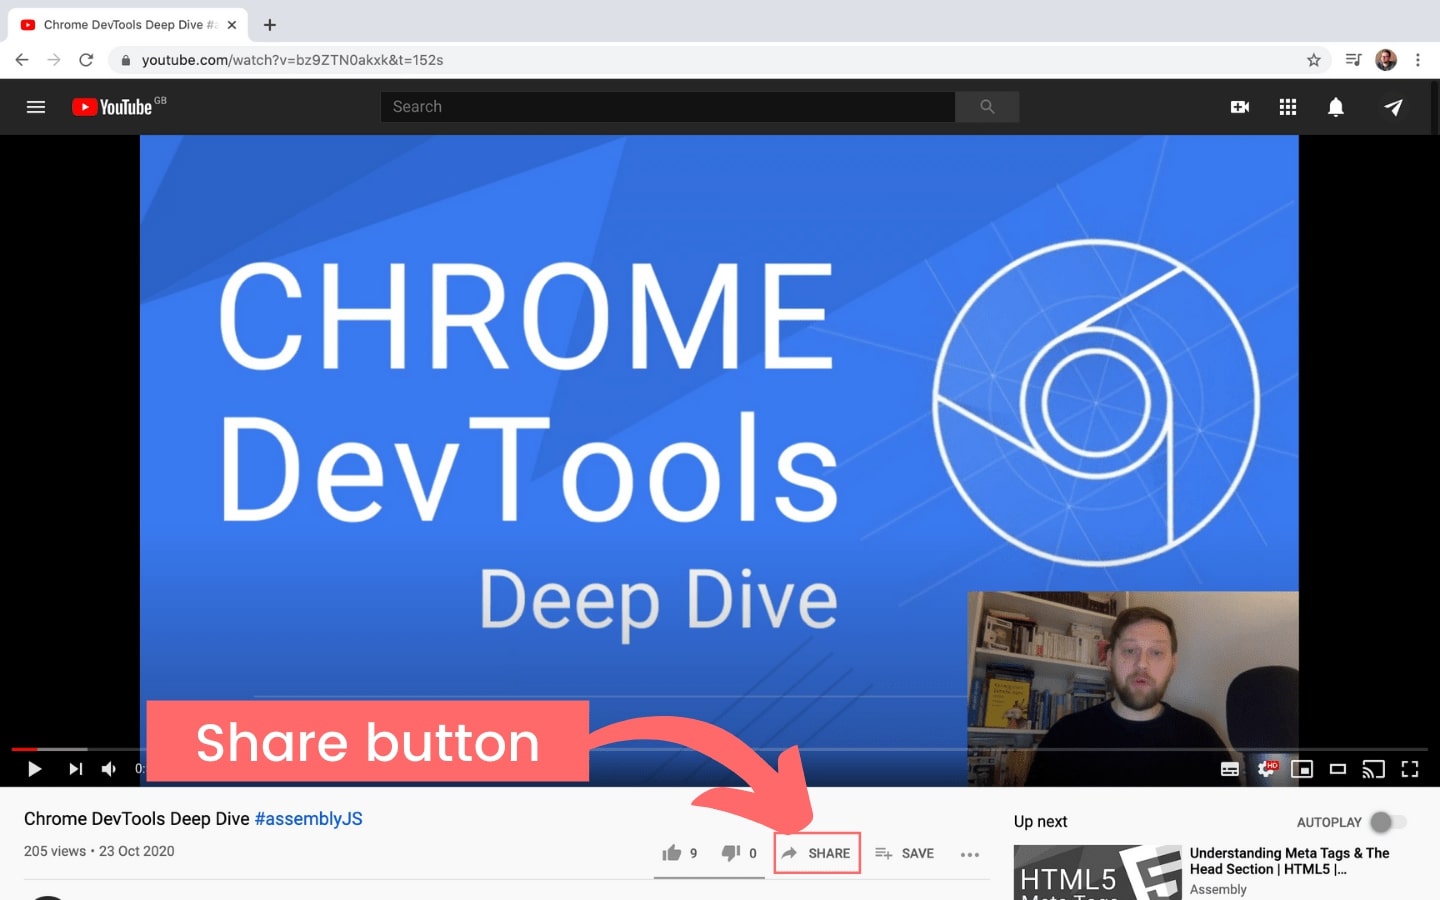
If you click that, you are presented with modal popup that offers a series of options. Selecting 'Embed' produces another popup modal that gives us this bit of HTML code which is the <iframe> element.
MDN describes an iframe as "a nested browsing context, embedding another HTML page into the current one." So that means we can use the iframe to display other web page, or part of a web page inside our own. An iframe pretty much acts like a mini web browser within a web browser. The content inside an iframe exists entirely independent from the surrounding elements.
The basic syntax for adding an iframe to a web page can be given with:
<iframe src='URL' /> </iframe>So here if we were to use the code snippet given to us by YouTube, we would be loading a part of YouTube inside our own page.
YouTube sends us their site with everything hidden from display but the video we want. In fact, you may have noticed an accompanying video at the top of this page. It is basically just being embedded into the page this way.
So YouTube gives us this chunk of code that we can copy and this is accompanied with a series of options, like showing the controls or maintaining users privacy so YouTube doesn’t collect data on visitors playing your video from your site.
When you embed this into your site, you will see that you have all of the familiar YouTube player controls. We can change height and width values if we need to so we can resize the video to meet our own needs.
The height and width attributes are used to specify the height and width of the iframe. We can also style the iFrame using CSS, which we will look at in the CSS section.
Like we saw with the <video> element, the width and height attribute values are specified in pixels (px) by default. You can also set these values in percentage units (%). By default, iframes without height and width attributes, or height and width CSS properties will 300 pixels wide, and 150 pixels in height.
Vimeo
We can do also embed Vimeo videos, and to do this we click the 'Share' button. Again, we can select from a series of options. We can make the video responsive or fixed in size, we can select a color scheme, and add autoplay and loop options among other things.
Once we’re happy, we can grab the resultant iframe and add it to our own web page.
USING IFRAMES AS LINK TARGETS
An iframe can also be used as a target for links. This means that an <iframe> can be identified using the name attribute.
So if you have an anchor link that has a target attribute that shares a value with the iframe's name attribute, when it is clicked, the linked resource will open in the iframe.
So below, we have an empty iframe, that has a name attribute value of 'landing-page'. Above the iframe is a link that has the target with a matching 'landing-page' value.
When the link is clicked, it will load the link's href in the iframe. Try it out below to how it basically works:
The code for this is:
<a href='https://www.assemblyJS.com' target='landing-page'> Click this link to load AssemblyJS.com in the iframe</a><iframe name='landing-page'></iframe>SUMMARY
So, we have looked at how we can we include videos in our web pages in two different ways. First we used the HTML video element and associated attributes to include a video from a local source on our web page. Next we looked at the iframe element which allows us to embed another HTML page into the current one. In our case, we looked at how we embedd a YouTube or Vimeo video and how we select different options to amend how the video displays on our web page.